A Beginner’s Guide to Creating a TypeScript Starter Project

For the last two years, I’ve worked a lot on small web projects where I used a simple TypeScript starter project that removes the basic installation process that a new project always has.
I wanted to create a new starter project and document the steps to provide some value to others and help them create their own.
Once this starter is finished, you can mark it as a template repository in GitHub. This simply means that you can easily use this as a basic setup whenever you create a new repository.
What will the starter include?
Here is the tech stack we’re going to use in this starter project:
- .editorconfig — to enforce consistency across different editors.
- Yarn — for installing external packages.
- Prettier — for automatic code formatting
- ESLint — for automatic code linting
- Babel — to transpile the code to something all browsers understand
- Webpack — for bundling your code
- TypeScript — for adding type safety to your JavaScript
- PostCSS — so you can use modern CSS features today
- Jest — for running unit tests on JavaScript/TypeScript code
- Cypress — for running End-to-End tests
PS: Each step is committed separately on the GitHub repository for this starter. If you get stuck while implementing it yourself, you can look through the commits to double-check your work.
Creating your GitHub repository
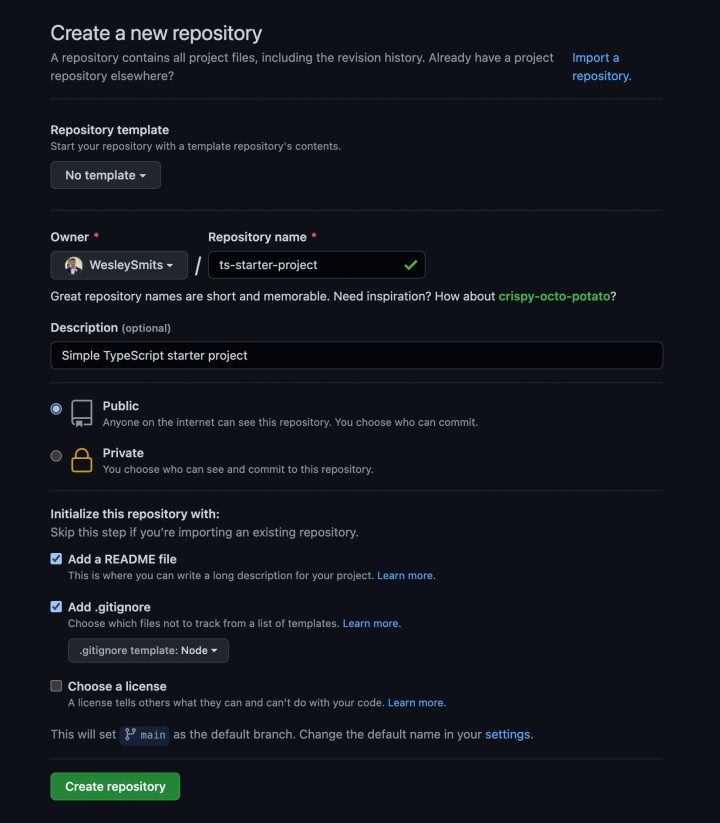
Log in to your GitHub profile and create a new repository. Give it a name like ts-starter-project and make sure to check the boxes to add a README and .gitignore file.
You can see the settings I used on the screenshot above.
Creating your folder
Navigate to your projects folder in the terminal, clone your repository, and navigate to the folder.
cd Projects/
git clone git@github.com:YourUserName/ts-starter-project.git
cd ts-starter-project
1. Adding a .editorconfig file
Editorconfig helps maintain consistent coding styles for multiple developers working on the same project across various editors and IDEs. The EditorConfig project consists of a file format for defining coding styles and a collection of text editor plugins that enable editors to read the file format and adhere to defined styles. EditorConfig files are easily readable, and they work nicely with version control systems.
Create a .editorconfig file in the root of your project and paste in the following contents:
# editorconfig.org
root = true

[*]
indent_style = space
indent_size = 4
end_of_line = lf
charset = utf-8
trim_trailing_whitespace = true
insert_final_newline = true
You can configure this to your liking, but I prefer to set my indentation to 4 spaces and always insert a final newline. These are very conventional standards and are good to follow.
2. Creating a simple Hello World page with WebPack and Babel
2.1 Setting up the basics
Run npm init -y in the terminal from within your project folder. This will create a default package.json file for you.
2.2 Installing Yarn
If you don’t already have yarn installed, you can install it globally with the following command:
npm install -g yarn
PS: It’s okay if you prefer to use NPM. Personally, I prefer Yarn.
2.3 Installing Babel
Babel allows us to write modern JavaScript code and not worry about browser support. It will transpile the code to something that all browsers understand. Run the following command to install all the requirements for babel.
yarn add @babel/core babel-preset-env babel-loader --dev
2.3 Setting up Webpack
Webpack bundles all JavaScript / TypeScript files into one or several bundles, depending on your configuration. This also includes installed NPM packages. Webpack can also minify the code for production.
For this project, we’re going to install the latest version of Webpack as a development dependency. Run the following command to add both Webpack and the Webpack Command Line Interface (webpack-cli) packages into your package.json.file:
yarn add webpack webpack-cli –dev
Create another file in the root of your project, name it webpack.config.js, and paste in the following code:
const path = require("path");

module.exports = {
    mode: "development",
    context: path.join(__dirname, "app"),
    entry: ["./js/app.js"],
    output: {
        path: path.join(__dirname, "public"),
        filename: "bundle.js",
    },
    module: {
        rules: [
            {
                test: /\.js$/,
                exclude: /node_modules/,
                use: ["babel-loader"],
            },
        ],
    },
};
This will look for all the JS assets in the app directory and it will copy all the compiled assets into the public directory.
Now create the following files and folders:
- app
- css
- js
- app.js
- index.html
Let’s place a simple alert in the app.js, so we can easily see if the code is loaded correctly:
alert("Hello World!");
Now, finally, let’s add some HTML and see if our setup works. Paste the following content into the index.html file:
<html lang="en">
    <head>
        <meta charset="UTF-8" />
        <meta name="viewport" content="width=device-width, initial-scale=1.0" />
        <title>TypeScript starter project</title>
    </head>
    <body>
        <h1>Hello World</h1>

        <script src="../public/bundle.js"></script>
    </body>
</html>
If you open up the index.html file in the browser now, you won’t see the alert just yet. We have stated we want to load the bundled JavaScript code from our public folder, but we haven’t actually compiled the code yet.
Let’s add a build command to the package.json file. In the scripts section, add the following line:
"build": "webpack"
Now run the build command from the terminal:
yarn build
You should get a message stating that Webpack has successfully compiled. If you refresh the browser window, you should be greeted with an alert now.
Don’t forget to add the public folder to the .gitignore file. We don’t need to commit these files, which are generated on every build:
# Build folder

public/
2.4 Loading the page dynamically
So far we have opened the index.html file directly into the browser. The script file was added manually into the HTML file as well. This works for now, but as the app grows there will be more scripts and styles. Webpack will smartly split these into several files based on performance best practices.
These files shouldn’t be manually added to the HTML file. Webpack should take care of this for us.
There’s a package called HTMLWebpackPlugin that handles this. It will create an index.html file with all scripts/styles which are needed. Install the package with the following command:
yarn add html-webpack-plugin –dev
Remove the hardcoded script reference from the index.html file:
<html lang="en">
    <head>
        <meta charset="UTF-8" />
        <meta name="viewport" content="width=device-width, initial-scale=1.0" />
        <title>TypeScript starter project</title>
    </head>
    <body>
        <h1>Hello World</h1>

        –
        <script src="../public/bundle.js"></script>
    </body>
</html>
Add the following code to the webpack.config.js file:
const path = require('path');
+ const HtmlWebpackPlugin = require('html-webpack-plugin');

module.exports = {
    mode: 'development',
    context: path.join(__dirname, 'app'),
    entry: [
        './js/app.js',
    ],
    output: {
        path: path.join(__dirname, 'public'),
        filename: 'bundle.js',
    },
    module: {
        rules: [
            {
                test: /\.js$/,
                exclude: /node_modules/,
                use: [
                    'babel-loader',
                ],
            },
        ],
    },
+   plugins: [new HtmlWebpackPlugin({
+       'template': path.resolve(__dirname, 'app/index.html'),
+       'inject': 'body'
+   })],
};
If you run the build command again, it should generate a new index.html file inside the public folder which works exactly like the previous one, but this time with dynamically added assets.
2.5 Adding Webpack Dev Server
We’re now going to add Webpack Dev Server, which comes with several advantages:
- It starts up a development server, so we no longer have to manually load the index.html in the browser, instead, we’ll receive a localhost link.
- It provides live reloading. When assets are modified, it will automatically refresh the contents of the page.
Install the package with the following command:
yarn add webpack-dev-server -dev
Add the following command to the scripts section in your package.json:
"scripts": {
    "build": "webpack",
+   "serve": "webpack serve",
    "test": "echo \"Error: no test specified\" && exit 1"
},
If you run this command (yarn serve), you should get the following output:
$ webpack serve
<i> [webpack-dev-server] Project is running at:
<i> [webpack-dev-server] Loopback: http://localhost:8080/
<i> [webpack-dev-server] On Your Network (IPv4): http://192.168.178.88:8080/
<i> [webpack-dev-server] On Your Network (IPv6): http://[fe80::1]:8080/
You can Ctrl or Cmd + click the link to open it in your browser, where you’ll see the app running.
3. Add TypeScript
Although this is a TypeScript starter project it currently only contains plain-old JavaScript. Let’s set up the app to support TypeScript.
Let’s change the name of the app.js file to app.ts. Also in the webpack.config.js we should change the reference to reflect the filename change.
Moreover, let’s add some actual TypeScript code into our app.ts:
– alert('Hello world!');
+ const greeting: string = 'Hello World!';
+ alert(greeting);
If you run the build command again, you’ll be greeted with the following error:
Compiled with problems:X

ERROR in ./js/app.ts 1:14

Module parse failed: Unexpected token (1:14)
You may need an appropriate loader to handle this file type, currently no loaders are configured to process this file. See https://webpack.js.org/concepts#loaders
> const greeting: string = 'Hello World!';
| console.log(greeting);
To fix this, we need to do several things:
- Install TypeScript and set up a
tsconfig.jsonfile to set up a TypeScript configuration - Install a Webpack loader so that Webpack knows how to handle TypeScript files
- Use the loader in our
webpack.config.js
Install TypeScript
Run the following command in your terminal:
yarn add typescript –dev
Now create a tsconfig.json file in the root of your project and paste in the following code:
{
    "compilerOptions": {
        "strict": true,
        "noImplicitAny": true,
        "module": "es6",
        "target": "es6",
        "allowJs": false,
        "types": ["node"],
        "typeRoots": ["./assets/js/types", "node_modules/@types"],
        "moduleResolution": "node",
        "allowSyntheticDefaultImports": true,
        "lib": ["es2019", "dom", "dom.iterable"]
    },
    "moduleDirectories": ["node_modules", "assets"],
    "exclude": ["./node_modules", "./public"]
}
This will configure your project to have strict mode enabled. Meaning, TypeScript will have stricter rules for your code. Since we have no prior code that needs to be refactored, this will ensure the quality of future code with no effort needed at this time.
Now let’s install the TypeScript loader:
yarn add ts-loader –dev
We can now use the ts-loader in the Webpack config file to handle TypeScript files with the following code:
module: {
    rules: [
–       {
–           test: /\.js$/,
–           exclude: /node_modules/,
–           use: [
–               'babel-loader',
–           ],
–       }
+       {
+           test: /\.ts$/,
+           use: 'ts-loader',
+           exclude: /node_modules/,
+       }
    ],
},
If you restart your Webpack dev server, you will now be greeted by an alert message proving that your TypeScript file was handled correctly.
Adding Prettier and ESLint
Prettier is an opinionated code formatter that reprints your code on save so that you don’t have to worry about the proper way to handle line-breaks, empty lines, extra spaces, or the right type of quotes your team uses.
ESLint is a JavaScript code linter that can check the problems mentioned above but also can spot errors, unused variables, or other mistakes or deviations from best practices.
Prettier has a nice explanation of the differences here.
Installing Prettier
Run the following commands to install Prettier and create the configuration files:
yarn add –dev –exact prettier
echo {}> .prettierrc.json
touch .prettierignore
The .prettierignore file will hold a list of all the files we don’t want Prettier to format, this can stay in sync with the .gitignore in many ways. Add the public folder to this file to start with.
public
The .prettierrc.json file contains any changes to the configuration options we want to make. Here’s the configuration I prefer to use in my projects:
{
    "trailingComma": "none",
    "tabWidth": 4,
    "semi": true,
    "singleQuote": true,
    "quoteProps": "consistent",
    "printWidth": 100
}
This removes trailing commas, forces semicolons, changes double-quotes to single-quotes, uses no quotes in object-properties, or all properties will be in quotes and stay at a maximum of around a 100 character line length before breaking the code to several lines.
Formatting existing code
Now run a one-time command to let Prettier format all of our existing code.
yarn prettier –write .
If you’ve followed along with the tutorial you’ll see Prettier made changes to the webpack.config.js, tsconfig.json, README.md and even the index.html.
Editor integration
Prettier has an integration with the most popular code editors. I use VSCode myself and have installed the prettier-vscode. Additionally, I switched on auto-formatting on save in my editor settings.
"editor.formatOnSave": true,
"editor.defaultFormatter": "esbenp.prettier-vscode",
Installing ESLint
To integrate ESLint, we need to install several packages. I’ll explain the use of each of them briefly:
- eslint — For actually using ESLint
- @typescript-eslint/eslint-plugin — Adding TypeScript linting rules to ESLint
- @typescript-eslint/parser — Allow ESLint to parse TypeScript code
- eslint-watch — So we can run ESLint on file changes
- eslint-config-airbnb-base — AirBNB has a fantastic set of rules available that give us a great starting point of rules to follow
- eslint-plugin-import — This adds ESLint support for linting import/export syntax and prevents issues with misspelling of file paths and import names
- eslint-config-prettier — Turns off all rules that are unnecessary or might conflict with Prettier
- eslint-plugin-prettier — Runs Prettier as an ESLint rule and reports differences as individual ESLint issues
Run the following command to install all of these:
yarn add –dev eslint eslint-watch eslint-config-airbnb-base eslint-plugin-import @typescript-eslint/eslint-plugin @typescript-eslint/parser eslint-config-prettier eslint-plugin-prettier
Now create a .eslintrc.json file with the following command:
touch .eslintrc.json
Here we’re going to add our config for ESLint, which rules we want to follow, which plug-ins we want to use etc. Add the following code to the file:
{
    "root": true,
    "parser": "@typescript-eslint/parser",
    "plugins": ["@typescript-eslint", "prettier"],
    "extends": [
        "eslint:recommended",
        "plugin:@typescript-eslint/recommended",
        "airbnb-base",
        "plugin:import/errors",
        "plugin:import/warnings",
        "prettier"
    ],
    "parserOptions": {
        "ecmaVersion": 7,
        "sourceType": "module"
    },
    "settings": {
        "import/resolver": {
            "node": {
                "extensions": [".ts"]
            }
        }
    },
    "env": {
        "browser": true,
        "es6": true,
        "node": true,
        "jest": true
    },
    "ignorePatterns": ["**/*.test.ts"],
    "rules": {
        "camelcase": "off",
        "import/extensions": "off",
        "max-len": ["error", { "code": 120 }],
        "no-restricted-syntax": "off",
        "no-console": 2,
        "no-alert": 2,
        "comma-dangle": ["error", "never"],
        "no-use-before-define": [
            "error",
            { "functions": false, "classes": true, "variables": true }
        ],
        "no-cond-assign": ["error", "except-parens"],
        "quote-props": [2, "consistent-as-needed"],
        "no-underscore-dangle": ["error", { "allowAfterThis": true }],
        "import/no-unresolved": [2],
        "no-param-reassign": [
            2,
            {
                "props": false
            }
        ],
        "@typescript-eslint/explicit-function-return-type": ["error"],
        "prettier/prettier": "error"
    },
    "overrides": [
        {
            "files": ["*.js"],
            "rules": {
                "@typescript-eslint/explicit-function-return-type": 0
            }
        }
    ]
}
Now let’s add two more scripts to our package.json. One to run ESLint once and report any errors, and one to watch file changes and report issues as they arise:
"scripts": {
    "build": "webpack",
    "serve": "webpack serve",
    "test": "echo \"Error: no test specified\" && exit 1",
+   "lint": "npx eslint ./app/",
+   "lint:watch": "npx esw –ext .js,.ts ./app –watch"
},
Now if you run either of these commands you should get two errors in the app.ts file. You don’t want to trivially set a variable to a string type if TypeScript can 100% infer this type from usage, and you don’t want to accidentally ship alerts to production.
To fix this, let’s empty the app.ts for the time being.
Adding PostCSS
PostCSS is a tool for transforming CSS with JavaScript. We can run it through the Webpack config, and it gets output to the browser as plain-old CSS. Using PostCSS has numerous benefits such as automatically adding vendor prefixes where needed, adding a style linter and allowing us to use the latest CSS standards, and converting that back to something all browsers can understand.
We’re going to install PostCSS together with some PostCSS plug-ins that will help with styling:
- postcss-preset-env — This lets you convert modern CSS into something most browsers can understand, determining the polyfills you need based on your targeted browsers or runtime environments
- postcss-nested — This allows a Sass-like unwrapping of nested rules. See the GitHub repo for more information.
- postcss-import — This plugin transforms @import rules by inlining content
- postcss-custom-properties — This plugin lets you use CSS Custom Properties in PostCSS
- cssnano — cssnano is a modern, modular compression tool written on top of the PostCSS ecosystem, which allows us to use many powerful features to compact CSS appropriately.
- postcss-loader — A loader to handle PostCSS files
- css-loader — The css-loader interprets @import and url() like import/require() and will resolve them.
- style-loader — A loader to handle adding styles into the DOM
- mini-css-extract-plugin — This plugin extracts CSS into separate files. It creates a CSS file per JS file which contains CSS. It supports On-Demand-Loading of CSS and SourceMaps.
Let’s install all of them, including postcss itself:
yarn add –dev postcss mini-css-extract-plugin css-loader style-loader postcss-loader cssnano postcss-preset-env postcss-nested postcss-import postcss-custom-properties postcss-at-rules-variables postcss-mixins postcss-each
Let’s create a PostCSS configuration file:
touch postcss.config.js
Paste the following config into the file:
module.exports = (ctx) => ({
    ident: "postcss",
    sourceMap: true,
    plugins: {
        "postcss-import": {},
        "postcss-at-rules-variables": {},
        "postcss-mixins": {},
        "postcss-each": {},
        "postcss-nested": {},
        "postcss-preset-env": {
            stage: 0,
            autoprefixer: { grid: false },
        },
        cssnano: ctx.env === "production" ? {} : false,
    },
});
The existence of this file in the root of your project will automatically tell PostCSS to use these plug-ins.
To get everything to work, you should add the loaders to the webpack.config.js:
rules: [
    {
        test: /\.js$/,
        exclude: /node_modules/,
        use: ['babel-loader']
    },
    {
        test: /\.ts$/,
        use: 'ts-loader',
        exclude: /node_modules/
    },
+   {
+       test: /\.p?(css)$/i,
+       oneOf: [
+           {
+               resourceQuery: /module/,
+               use: [
+                   MiniCssExtractPlugin.loader,
+                   {
+                       loader: 'css-loader',
+                       options: {
+                           url: false,
+                           sourceMap: env.production !== true,
+                           importLoaders: 1,
+                           modules: {
+                               localIdentName: '[local]_[hash:base64:5]'
+                           }
+                       }
+                   },
+                   {
+                       loader: 'postcss-loader',
+                       options: {
+                           sourceMap: env.production !== true
+                       }
+                   }
+               ]
+           },
+           {
+               use: [
+                   MiniCssExtractPlugin.loader,
+                   {
+                       loader: 'css-loader',
+                       options: {
+                           url: false,
+                           sourceMap: env.production !== true,
+                           importLoaders: 1,
+                           modules: false
+                       }
+                   },
+                   {
+                       loader: 'postcss-loader',
+                       options: {
+                           sourceMap: env.production !== true
+                       }
+                   }
+               ]
+           }
+       ]
+   }
]
Finally, let’s create a CSS file with some styling in it to verify that everything works as expected. Create a main.pcss file in the app/css/ folder and add it as an entry-point to Webpack. If all works well, your page should now have a very noticeable background.
* {
    background-color: hotpink;
}
– entry: ['./js/app.ts'],
+ entry: {
+     app: './js/app.ts',
+     styles: './css/main.pcss'
+ },
PS: If you feel you don’t need some PostCSS plug-ins, feel free to leave them out of the yarn install and postcss.config.js.
Adding Jest
Jest is a great JavaScript testing framework. It allows you to easily add unit tests for your code to validate that it works as expected. It also provides code coverage statistics to make sure we test the right flows.
In order to add Jest to our TypeScript project, we’re going to have to install three packages:
- Jest — Obviously, we need Jest itself.
- ts-jest — This is a Jest transformer with source map support that lets you use Jest to test projects written in TypeScript.
- @types/jest — This package contains the Type definitions for Jest.
Let’s install all three of them to our devDependencies:
yarn add –dev jest ts-jest @types/jest
Furthermore, let’s update our test command in the package.json to run Jest right away. Moreover, let’s add a watch command, so we can write tests that run as we save files.
– "test": "echo \"Error: no test specified\" && exit 1",
+ "test": "jest",
+ "test:watch": "jest –watch",
ts-jest provides a command for generating a jest.config.js file with ts-jest set as the parser. Let’s run this now to create the file.
npx ts-jest config:init
Finally, we need to let TypeScript know about the Jest type definitions. Update the types array in the tsconfig.json.
– "types": ["node"],
+ "types": ["node", "jest"],
We can now add our first test. Let’s create a simple function that we can test in the app.ts.
export default function sum(a: number, b: number): number {
    return a + b;
}
Now create an app.test.ts in the same folder, which will contain our tests for the app.ts.
import sum from "./app";

test("adds 1 + 2 to equal 3", () => {
    expect(sum(1, 2)).toBe(3);
});
This file simply imports the function from app.ts and tests that 1 and 2 add up to 3.
If you run the test command in your terminal now, you should see a passing test.
yarn test
Bonus Jest Tip
If your editor has support for a Jest extension, this helps with running tests in the background automatically. I use VSCode and have installed the Jest extension. With the following setting in my VSCode settings, it now automatically runs tests when the test- or source files changes.
"jest.autoRun": {
  "watch": true,
  "onStartup": ["all-tests"]
}
Adding Cypress
Cypress is a next-generation front-end testing tool built for the modern web. It allows you to run tests against your application from a user standpoint and validate that the user gets the experience you meant for them.
Run the following command to install Cypress:
yarn add cypress –dev
Add the following line to your package.json scripts, so you can easily open Cypress:
"cypress:open": "cypress open"
If you run the command, you’ll see that Cypress will install some demo tests against an application they have online. The demo tests are incredibly helpful to see what Cypress can do and how to do it. I’d recommend you go through them and play around with Cypress yourself based on these tests.
When you’re done with that, you can delete all files in the cypress/integration, cypress/fixtures and cypress/screenshots folders.
I’d also recommend adding the cypress/screenshots folder to your .gitignore file.
# Build folder

public/

- # Cypress screenshots
- cypress/screenshots
Cleaning up
We’ve come to the end of this tutorial, and it’s time for some clean-up, so your new projects won’t be created with demo code. You can empty the following files:
- app.ts
- app.test.ts
- main.pcss
Conclusion
I hope you learned something from this tutorial on how to build a simple TypeScript starter. If you have any thoughts, questions, feedback, or improvements, please let me know in the comments.
The GitHub repository contains separate commits for all chapters in this article, in case you want to go through the changes there.
You can follow me on Twitter or buy me a Ko-fi if you’d like to support me.
TypeScript Patterns Cheat Sheet
Master the 5 most common patterns with this one-page visual guide.